Input
Any HTML5 input type
The images are from Chrome, that has support for all HTML5 input types

Additional methods
->type(string $type = 'text')
$type
= Html5 input type
You can omit the type()
method for text fields.
Input::make('Name')
Input::make('Email')->type('email')
->autocomplete(string $autocomplete)
Sets the input autocomplete attribute
Input::make('Password')->type('password')->autocomplete('new-password')
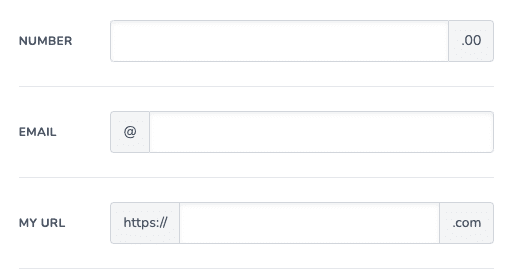
->prefix(string $prefix)
Sets a prefix text displayed in front of the field, with a gray background.
Input::make('Url')->type('url')->prefix('https://')
->suffix(string $suffix)
Sets a suffix text displayed after the field, with a gray background.
Input::make('Url')->type('url')->prefix('https://')->suffix('.com')
->required()
Adds the required attribute to the input field. Same as rules('required')
Input::make('Name')->required()
->placeholder(string $placeholder)
Input::make('Department')->placeholder('Example: Sales, Marketing, Finance')
->step()
->min()
->max()
->step()
->min()
->max()
Not applicable on all field types
These methods apply the equivalent attribute to the input field, but have no effect on incompatible field types.
->step(float|string $step)
->min(float|string $min)
->max(float|string $max)
Example, <input type="number" step="2" min="5" max="10" />
Input::make('Number')
->type('number')
->prefix('#')
->step(2)
->min(5)
->max(10)
->rules('required|integer')

Icons
Display an icon in front of the field on a grey background.
Display an icon after the field on a grey background.
The icon is placed before the prefix/suffix, if both are applied.
The package provides three different ways to declare icons
Blade UI Kit icons
REQUIREMENTS: Install and setup Blade UI Kit Icons
$icon
= "path/file-name". Depending on your Blade-ui-kit-icons config.Applied using the Blade-ui-kit @svg() directive
->icon(string $blade_ui_icon_path)
->suffixIcon(string $blade_ui_icon_path)
//requires Blade UI kit icons
Input::make('Url')->type('url')->icon('globe'); //before the input
Input::make('Url')->type('url')->suffixIcon('globe'); //after the input
TallForms bundled icons
REQUIREMENTS: Create a blade view that represents the icon.
$blade_file_path
= "path.blade-view".Applied using this package blade icon component. Available icons, see Icons page
->tallIcon(string $blade_file_path)
->suffixTallIcon(string $blade_file_path)
Input::make('Url')->type('url')->tallIcon('path.blade-view'); //before the input
Input::make('Url')->type('url')->suffixTallIcon('path.blade-view'); //after the input
You can also use the bundled blade component anywhere in your project
<x-tall-svg :path="path.blade-view" class="..." />
HTML icons
$html
= "< ... >".Applied using the
{!! $html !!}
blade directive
->htmlIcon(string $html)
->suffixHtmlIcon(string $html)
Input::make('Url')->type('url')->htmlIcon('<i class="fas fa-globe-americas"></i>'); //before the input
Input::make('Url')->type('url')->suffixHtmlIcon('<i class="fas fa-globe-americas"></i>'); //after the input
Examples
See Input Examples
Last updated
Was this helpful?